Tomcat源码剖析(一)启动
首先需要明白的是:
Tomcat以多模块划分各个各个功能点,每个模块都统一实现了生命周期的接口,并且每个模块的生命周期都由它的拥有者或父类启动。Tomcat的整体结构如下: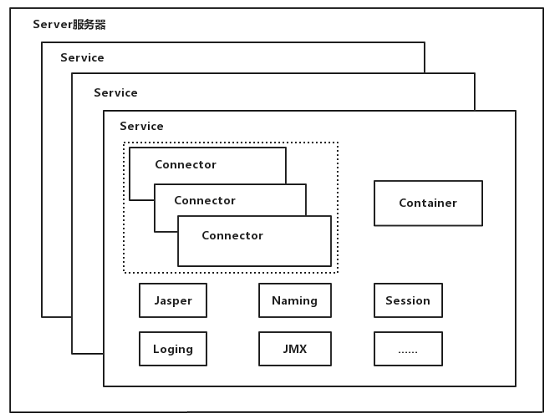
-
Server负责整个项目的关闭和启动 -
每个
Server中,可以包含多个Service,Service便是我们常说的服务,不同的Service可以用来监听不同的端口 -
Service包含有多个连接器以及各种组件,连接器可以用来负责不同的连接方式以及底层的不同IO,比如Http,AJP,Nio,Bio,Apr等, -
Service中最重要的组件便是容器(Container),容器中有父容器和子容器之分,容器的主要作用便是用来处理连接器监听到的请求。容器级别由高到低分为以下几个:- 引擎(
Engine):引擎是容器中的顶级容器,在它之上不再用其他的容器,引擎的作用和Server类似,用来作为所有容器的入口点,并且引擎需要根据请求和配置文件,将来自不同的host的请求分配给不同的host处理器 -
虚拟主机(
Host):一个引擎可以配置多个Host,而不同的Host所指向的webapps目录可能不同,这说明,启动一个Tomcat,但是索引到的具体文件可以处于不同的目录中,一般我们不会配置多个Host,Host的主要作用便是根据请求寻找到可以处理它的Context。
虽然我们不会配置多个
Host,但是这并不意味着可以不配置Host,因为在Context的代码中,有使用Host的地方,如果不配置,Tomcat将会报出空指针异常- 上下文(
Context):上下文环境便是我们真正开发的项目所在的地方,熟悉Servlet的同学应该对Context非常熟悉 -
Servlet:Servlet便是真正处理请求的地方,因此一个Http请求经过层层解析加传递,最终会传递到Servlet容器中。
- 引擎(
-
其他组件:其他的组件大多数都被包含在
Service中,主要包括Serssion管理器,JMXBean注册器等等
启动
其实,明白了上面Tomcat的结构以后,总结出Tomcat的启动过程就是:逐级启动
Tomcat的启动方法在org.apache.catalina.startup.Bootstrap类中
类中包含一块静态代码块:
static {
        // 获取当前运行目录
        String userDir = System.getProperty("user.dir");

        // 查看是否有设置CATALINA_HOME 属性(启动参数 -Dcatalina.home设置)
        String home = System.getProperty(Globals.CATALINA_HOME_PROP);
        File homeFile = null;

        if (home != null) {
            File f = new File(home);
            try {
                homeFile = f.getCanonicalFile();
            } catch (IOException ioe) {
                homeFile = f.getAbsoluteFile();
            }
        }
        //如果没有设置属性,则查找当前目录的上一级是否包含bootstrap.jar
        if (homeFile == null) {
            // First fall-back. See if current directory is a bin directory
            // in a normal Tomcat install
            File bootstrapJar = new File(userDir, "bootstrap.jar");

            if (bootstrapJar.exists()) {
                File f = new File(userDir, "..");
                try {
                    homeFile = f.getCanonicalFile();
                } catch (IOException ioe) {
                    homeFile = f.getAbsoluteFile();
                }
            }
        }
        //如果上层目录依然没有,则设置为当前运行目录
        if (homeFile == null) {
            // Second fall-back. Use current directory
            File f = new File(userDir);
            try {
                homeFile = f.getCanonicalFile();
            } catch (IOException ioe) {
                homeFile = f.getAbsoluteFile();
            }
        }

        catalinaHomeFile = homeFile;
        System.setProperty(
                Globals.CATALINA_HOME_PROP, catalinaHomeFile.getPath());

        // 查看是否有设置CATALINA_BASE(启动参数 -Dcatalina.base设置)
        String base = System.getProperty(Globals.CATALINA_BASE_PROP);
        //如果没有设置,则默认和CATALINA_HOME相同
        if (base == null) {
            catalinaBaseFile = catalinaHomeFile;
        } else {
            File baseFile = new File(base);
            try {
                baseFile = baseFile.getCanonicalFile();
            } catch (IOException ioe) {
                baseFile = baseFile.getAbsoluteFile();
            }
            catalinaBaseFile = baseFile;
        }
        System.setProperty(
                Globals.CATALINA_BASE_PROP, catalinaBaseFile.getPath());
    }
上面代码中:
Tomcat的包并不叫org.apache.tomcat,而是org.apache.catalina,这让我想起了LOL里面的卡特琳娜-
Tomcat有两个目录,一个叫catalina home,一个叫catalina base,什么意思呢?这是作者为了使Tomcat能够在需要在同一台电脑中同时运行两个Tomcat实例而设置的,当需要在同一个电脑中再次启动一个Tomcat实例,只需将Tomcat的conf、logs、temp、webapps和work目录单独复制一份,而其他的文件可以被公用。也就说catalina_home指的是公共目录。catalina_base指的是实例私有信息。 -
getCanonicalFile()和getAbsoluteFile()区别一般只有在使用相对路径的时候才会显现出来。canonicalPath()是会真正的解析相对路劲的,比如在/opt/tomcat/test目录下输入../,canonicalPath会显示/opt/tomcat/而getAbsolutePath()仅仅是简单将字符串拼接起来:/opt/tomcat/test/..对于
CanonicalFile中错误的路径,比如*./,CanonicalFile()会抛出异常,而AbsoluteFile()会返回null
总之,这段代码就是用来设置catalina的环境变量。
再看main方法
public static void main(String args[]) {

        synchronized (daemonLock) {
            if (daemon == null) {
                // Don't set daemon until init() has completed
                Bootstrap bootstrap = new Bootstrap();
                bootstrap.init();
                daemon = bootstrap;
            } else {
                Thread.currentThread().setContextClassLoader(daemon.catalinaLoader);
            }
        }

            String command = "start";
            if (args.length > 0) {
                command = args[args.length - 1];
            }

            if (command.equals("startd")) {
                args[args.length - 1] = "start";
                daemon.load(args);
                daemon.start();
            } else if (command.equals("stopd")) {
                args[args.length - 1] = "stop";
                daemon.stop();
            } else if (command.equals("start")) {
                daemon.setAwait(true);
                daemon.load(args);
                daemon.start();
                if (null == daemon.getServer()) {
                    System.exit(1);
                }
            } else if (command.equals("stop")) {
                daemon.stopServer(args);
            } else if (command.equals("configtest")) {
                daemon.load(args);
                if (null == daemon.getServer()) {
                    System.exit(1);
                }
                System.exit(0);
            } else {
                log.warn("Bootstrap: command \"" + command + "\" does not exist.");
            }
    }
去除掉结构性代码后,可以发现首先便是检查daemon是否被初始化,如果没有初始化则使用Bootstrap初始化,
初始化有个比较重要的方法便是init()方法。
这里init()方法就不贴代码了,主要做的工作是初始化三种主要的ClassLoader,然后使用catalinaLoader实例化org.apache.catalina.startup.Catalina类。
- 第一,为什么要使用三种
ClassLoader,因为Tomcat作为一种容器,是需要运行其他用户的代码的,而为了实现用户间的依赖相互隔离,只能自定义ClassLoader。三种ClassLoader分别是Tomcat代码的加载器,共享加载器和用户代码加载器。当然还可以定期其他加载器,不过需要在Tomcat配置文件中配置。 - 这里可以看到
Bootstrap通过加载器加载了Catalina,而Catalina才是真正的启动Server的类
然后便是根据启动参数,调用daemon的各个参数。
再看,通过启动参数,会调用Bootstrap的load和start方法。
在这里,需要知道的Tomcat的启动分两步,第一步为load,主要用来初始化各种启动参数,第二步为start(),用来启动各个服务,因此我们首先由load深入:
Load
Bootstrap的load代码比较简单,就是通过反射调用Catalina类的load方法,这里看下Catalina的load方法:
    /**
     * Start a new server instance.
     */
    public void load() {

        if (loaded) {
            return;
        }
        loaded = true;


        initDirs();

        initNaming();

        ConfigFileLoader.setSource(new CatalinaBaseConfigurationSource(Bootstrap.getCatalinaBaseFile(), getConfigFile()));
        File file = configFile();


        Digester digester = createStartDigester();

        try (ConfigurationSource.Resource resource = ConfigFileLoader.getSource().getServerXml()) {
            InputStream inputStream = resource.getInputStream();
            InputSource inputSource = new InputSource(resource.getURI().toURL().toString());
            inputSource.setByteStream(inputStream);
            digester.push(this);
            digester.parse(inputSource);
        } catch (Exception e) {
            if  (file == null) {
                log.warn(sm.getString("catalina.configFail", getConfigFile() + "] or [server-embed.xml"), e);
            } else {
                log.warn(sm.getString("catalina.configFail", file.getAbsolutePath()), e);
                if (file.exists() && !file.canRead()) {
                    log.warn(sm.getString("catalina.incorrectPermissions"));
                }
            }
            return;
        }

        getServer().setCatalina(this);
        getServer().setCatalinaHome(Bootstrap.getCatalinaHomeFile());
        getServer().setCatalinaBase(Bootstrap.getCatalinaBaseFile());

        // Stream redirection
        initStreams();
        // Start the new server
        getServer().init();

    }
initNaming()这个东西我们很少使用,它的作用和现在String的application.prpertion比较像iniDirs()貌似只是简单的试了一下操作系统的临时文件夹目录是否存在- 在这只是便是这个方法的重点:通过
Digester组件,循环读取Tomcat的server.xml文件,然后根据定制的规则创建对象,设置属性,创建对象,设置属性。简单来说,Digester便是简单的根据xml文件的配置进行实例化对象的一个组件。 createStartDigester()非常关键,因此在后面你会发现没有初始化对象的代码,也没有设置属性的代码,你根本不知道默认使用的是哪个实现类,而具体的对应类,其实就在这个方法中,也就是说这个方法,其实就是实例化Server,Service,Connector,Engine,Host,Context,Servlet等对象以及设置其属性的。initStreams();重定向System.out和System.err,这也是为什么以前Tomcat中使用System.out打印不出来信息的原因,所有信息都重定向到了日志文件中。不过后来好像又添加了控制台输出- 最后一行代码便是
getServer().init();调用Server类的初始化方法
在接下来的几个组件中,会频繁的看见xxx.init()方法,这是因为几乎Tomcat的所有的模块都实现了Lifecycle接口,Lifecycle接口主要包含以下几个方法:
 */
public interface Lifecycle {

    public void addLifecycleListener(LifecycleListener listener);

    public LifecycleListener[] findLifecycleListeners();

    public void removeLifecycleListener(LifecycleListener listener);

    public void init() throws LifecycleException;

    public void start() throws LifecycleException;


    public void stop() throws LifecycleException;


    public void destroy() throws LifecycleException;


    public LifecycleState getState();


    public String getStateName();

    public interface SingleUse {
    }
}
可以看出来这个是一个被观察者,并且这个方法定义了一个模块的整个生命周期:init->start->stop->destory
- 关于
Tomcat的设计模式,后续会专门写一篇文章介绍 - 基本上所有的模块都实现了上述接口,因此所有的模块都会包含上述状态
再来看StandServer的init()方法
基本上所有的模块都不是直接实现的Lifecycle接口,而是通过一个抽象类通过实现一些通用的模板方法,而具体的方法都是通过重载xxxInternal()实现。
  super.initInternal();

        reconfigureUtilityExecutor(getUtilityThreadsInternal(utilityThreads));
        register(utilityExecutor, "type=UtilityExecutor");
        onameStringCache = register(new StringCache(), "type=StringCache");
        MBeanFactory factory = new MBeanFactory();

        factory.setContainer(this);
        onameMBeanFactory = register(factory, "type=MBeanFactory");

        globalNamingResources.init();

        // Populate the extension validator with JARs from common and shared
        // class loaders
        if (getCatalina() != null) {
            ClassLoader cl = getCatalina().getParentClassLoader();
            // Walk the class loader hierarchy. Stop at the system class loader.
            // This will add the shared (if present) and common class loaders
            while (cl != null && cl != ClassLoader.getSystemClassLoader()) {
                if (cl instanceof URLClassLoader) {
                    URL[] urls = ((URLClassLoader) cl).getURLs();
                    for (URL url : urls) {
                        if (url.getProtocol().equals("file")) {
                            try {
                                File f = new File (url.toURI());
                                if (f.isFile() &&
                                        f.getName().endsWith(".jar")) {
                                    ExtensionValidator.addSystemResource(f);
                                }
                            } catch (URISyntaxException e) {
                                // Ignore
                            } catch (IOException e) {
                                // Ignore
                            }
                        }
                    }
                }
                cl = cl.getParent();
            }
        }
        // Initialize our defined Services
        for (int i = 0; i < services.length; i++) {
            services[i].init();
        }
    }
- 前面基本上都是一个
JMXBean的注册 -
其次是通过
Tomcat自定义的顶级加载器加载Tomcat的依赖项 -
主要代码为遍历所有的
service,然后依次调用他们的初始化方法前面说过,
Tomcat的主要模块基本都是通过Digester组件初始化的因此你在代码中是找不到哪里初始化servercs属性的
StandServer的下一级为StandService,因此继续看StandService的initInternal()方法
    @Override
    protected void initInternal() throws LifecycleException {

        super.initInternal();

        if (engine != null) {
            engine.init();
        }

        // Initialize any Executors
        for (Executor executor : findExecutors()) {
            if (executor instanceof JmxEnabled) {
                ((JmxEnabled) executor).setDomain(getDomain());
            }
            executor.init();
        }

        // Initialize mapper listener
        mapperListener.init();

        // Initialize our defined Connectors
        synchronized (connectorsLock) {
            for (Connector connector : connectors) {
                connector.init();
            }
        }
    }
Service的下一层便是容器,顶级容器便是Engine,因此Service会调用Engine的初始化- 接下来便是初始化线程池
- 最后初始化连接器
因此,由上面的代码可以看出来,Service主要的组成为连接器和容器,连接器负责在外接收请求,容器就负责在内处理请求。
继续往下:看StandardEngine中initInternal实现:
    @Override
    protected void initInternal() throws LifecycleException {
        getRealm();
        super.initInternal();
    }
到这里,可以说容器的initInternal基本上看完了,因为剩下的容器基本上都主要是调用了super.initInternal()方法,而super.initInternal()基本上也没有什么关键性的代码。这说明容器的初始化内容并不多。
Start
load完毕,紧接着便是start。start基本和load一样,都是层层调用,由父模块调用子模块。
因此我们依然从catalina的start开始阅读:
 public void start() {

        if (getServer() == null) {
            load();
        }

        if (getServer() == null) {
            return;
        }
         getServer().start();


        // Register shutdown hook
        if (useShutdownHook) {
            if (shutdownHook == null) {
                shutdownHook = new CatalinaShutdownHook();
            }
            Runtime.getRuntime().addShutdownHook(shutdownHook);
            if (logManager instanceof ClassLoaderLogManager) {
                ((ClassLoaderLogManager) logManager).setUseShutdownHook(
                        false);
            }
        }

        if (await) {
            await();
            stop();
        }
    }
删除结构性的代码,可以发现主要有以下几点:
- 首先查看
Server是不是未初始化,如果没有初始化则初始化 -
再次查看
Server是不是未初始化,如果没有初始化,则说明前面的代码初始化失败,返回 -
调用
Server的start方法 -
判断是否使用关闭钩子,如果需要使用关闭钩子,则初始化关闭钩子
什么叫关闭钩子呢?很多时候,我们可以会通过杀进程的方式来关闭一个进程,这样可能导致程序会有一些收尾工作没完成,而此时可以向
JVM注册一个关闭钩子,这样在程序即将被关闭之前,会立即调用这个关闭钩子,从而完成收尾工作 -
await()释放CPU,等待被唤醒然后关闭
继续看StandardServer的startInternal方法:
    @Override
    protected void startInternal() throws LifecycleException {

        fireLifecycleEvent(CONFIGURE_START_EVENT, null);
        setState(LifecycleState.STARTING);

        globalNamingResources.start();

        // Start our defined Services
        synchronized (servicesLock) {
            for (int i = 0; i < services.length; i++) {
                services[i].start();
            }
        }

        if (periodicEventDelay > 0) {
            monitorFuture = getUtilityExecutor().scheduleWithFixedDelay(
                    new Runnable() {
                        @Override
                        public void run() {
                            startPeriodicLifecycleEvent();
                        }
                    }, 0, 60, TimeUnit.SECONDS);
        }
    }
- 第一,通知观察者开始事件
-
启动各个
services -
开启后台定时任务
这个后台定时任务其实就是一个线程,这个线程用来运行所有的
Tomcat需要在后台定时执行的一些任务,比如热部署的时候检查更新,session管理器检查session是否过期等,这样做的好处便是只用一个线程完成很多事,节约CPU性能
接下来继续看StandardService的startInternal
  @Override
    protected void startInternal() throws LifecycleException {


        setState(LifecycleState.STARTING);

        if (engine != null) {
            synchronized (engine) {
                engine.start();
            }
        }
        synchronized (executors) {
            for (Executor executor: executors) {
                executor.start();
            }
        }

        mapperListener.start();

        synchronized (connectorsLock) {
            for (Connector connector: connectors) {
                // If it has already failed, don't try and start it
                if (connector.getState() != LifecycleState.FAILED) {
                    connector.start();
                }
            }
        }
    }
其实和load差不多,都是启动各个组件。
最后看看容器的启动方法:
容器的启动方法都是方法父类中启动,也就是他们的启动都是调用父类的start方法
    @Override
    protected synchronized void startInternal() throws LifecycleException {

        // Start our subordinate components, if any
        logger = null;
        getLogger();
        Cluster cluster = getClusterInternal();
        if (cluster instanceof Lifecycle) {
            ((Lifecycle) cluster).start();
        }
        Realm realm = getRealmInternal();
        if (realm instanceof Lifecycle) {
            ((Lifecycle) realm).start();
        }

        // Start our child containers, if any
        Container children[] = findChildren();
        List<Future<Void>> results = new ArrayList<>();
        for (int i = 0; i < children.length; i++) {
            results.add(startStopExecutor.submit(new StartChild(children[i])));
        }

        MultiThrowable multiThrowable = null;

        for (Future<Void> result : results) {
            try {
                result.get();
            } catch (Throwable e) {
                log.error(sm.getString("containerBase.threadedStartFailed"), e);
                if (multiThrowable == null) {
                    multiThrowable = new MultiThrowable();
                }
                multiThrowable.add(e);
            }

        }
        if (multiThrowable != null) {
            throw new LifecycleException(sm.getString("containerBase.threadedStartFailed"),
                    multiThrowable.getThrowable());
        }

        // Start the Valves in our pipeline (including the basic), if any
        if (pipeline instanceof Lifecycle) {
            ((Lifecycle) pipeline).start();
        }

        setState(LifecycleState.STARTING);

        // Start our thread
        if (backgroundProcessorDelay > 0) {
            monitorFuture = Container.getService(ContainerBase.this).getServer()
                    .getUtilityExecutor().scheduleWithFixedDelay(
                            new ContainerBackgroundProcessorMonitor(), 0, 60, TimeUnit.SECONDS);
        }
    }
- 之所以都在父类启动,是因为基本上所有的容器都拥有相同的组件 ,比如
Cluster,Realm,Children,Pipeline等等,因此都放在父类统一代码即可 Cluster是用来作Tomcat集群通信用的Realm使用Tomcat安全角色验证用的children指的是各个子容器Pipeline指的是调用管道,管道的概念和Servlet的过滤器的概念差不多,父容器调用子容器的方法并不是直接调用的,而是通过管道,管道依次调用管道中的阀,直到最后调用BasicalValve也就是基础阀,才会调用到子容器,因此基础阀一般都是用来调用子容器的,这样实现的好处就是可以层层添加过滤,监控,等等,方便调用前的扩展。
到这里,Tomcat成功启动。
其实,只要明白了Tomcat的整体结构,理解Tomcat的启动流程并不难。
参考链接:
《How Tomcat Works》